SQL is an essential tool for any data-related job. One of the most common SQL implementations is MySQL.
MySQL, like many other SQL interpreters, is set up as a client-server pair. The server software is responsible for managing the database and executing SQL commands. The user runs the client software to send the commands. Typically, the server is set up on a dedicated computer, and many clients access it over the network.
If you are learning SQL, or if you are experimenting with data and you don’t want to risk breaking the database, you might want to set up both the client and the server on your own computer.
You can install MySQL server on your computer using the precompiled binaries. Detailed instructions can be found in the official documentation. However, the setup involves some post-installation steps which can be difficult to follow.
Alternatively, we can set up a Docker container that runs a MySQL server. This is very quick, and does not require you to tweak your own computer’s configuration. You will be able to run SQL commands in a few minutes.
Install Docker engine
Docker usage is a rich subject, but for practical purposes, you can think of a Docker container as an independent computer running within your computer.
Containers are usually dedicated to a single job, such as web servers, database servers, or other tasks. The specific description of software run in a container is called an image. Using Docker, you can create containers out of images, start or stop those containers. This can be done either by a command-line interface, or with a graphical interface (Docker Desktop). All lower-level tasks such as managing memory or disks, or handling network connections are handled by the Docker engine automatically.
You can install the Docker Desktop for Linux, Windows, or MacOS using the instructions on this page
If you use Linux and you are comfortable on the command line, you may just install the Docker Engine. The rest of the text will use the command-line interface only.
Set up and run a MySQL container
The DockerHub website is a repository of countless Docker images, each tailored for a specific purpose. We first pull the official MySQL image:
$ docker pull mysql
Using default tag: latest
latest: Pulling from library/mysql
cea172a6e83b: Pull complete
daac2c594bdd: Pull complete
cb8acbf2440c: Pull complete
fae51f7de1fb: Pull complete
b2ead3e96e6b: Pull complete
769c3ac51f88: Pull complete
79f239a40e62: Pull complete
c11056354384: Pull complete
49978e7ccddf: Pull complete
548990e33276: Pull complete
Digest: sha256:0596fa224cdf3b3355ce3ddbfd7ce77be27ec9e51841dfc5d2e1c8b81eea69d2
Status: Downloaded newer image for mysql:latest
docker.io/library/mysql:latest
Now we create and start a container from this image.
$ docker run --name mysql_db -e MYSQL_ROOT_PASSWORD=mypasswd -d mysql
b4e09207a18ff2a221bfd8c4975a6aa20d7d4b779986649b7827af4be1a2ea56
The output is a long hexadecimal string identifying the container. It will be different for you.
The option --name mysql_db sets the name of the container to mysql_db, which you can change as you like.
The server requires a password for access. The option -e MYSQL_ROOT_PASSWORD=mypasswd sets the password to mypasswd. You can change this to whatever you like.
It is not secure to write the password explicitly like this, but as we are setting up the container on the same computer for personal use, we don’t worry too much about that. The image page describes more secure ways of doing this.
The -d option runs the container in the background so that it keeps running even after you close the terminal window.
Connect to MySQL server in the container
The MySQL server is now running inside the container mysql_db. In order to interact with it, we can use the docker exec command. This will execute a shell command in the container.
$ docker exec -it mysql_db mysql -uroot -pmypasswd

mysql: [Warning] Using a password on the command line interface can be insecure.
Welcome to the MySQL monitor.  Commands end with ; or \g.
Your MySQL connection id is 12
Server version: 9.2.0 MySQL Community Server - GPL

Copyright (c) 2000, 2025, Oracle and/or its affiliates.

Oracle is a registered trademark of Oracle Corporation and/or its
affiliates. Other names may be trademarks of their respective
owners.

Type 'help;' or '\h' for help. Type '\c' to clear the current input statement.

mysql>
Here, the -it option tells Docker to run the command interactively in a terminal inside the container mysql_db.
The part mysql -uroot -pmypasswd is a complete command. Here we specify the user as root and the password as mypasswd. There should be no space between the option and the value (i.e., not -p mypasswd).
The server is now waiting for commands. As a start, let’s try some basic commands:
mysql> show databases;
+--------------------+
| Database           |
+--------------------+
| information_schema |
| mysql              |
| performance_schema |
| sys                |
+--------------------+
4 rows in set (0.00 sec)
mysql> select PI(), COS(PI()), EXP(1), CURRENT_DATE;
+----------+-----------+-------------------+--------------+
| PI()     | COS(PI()) | EXP(1)            | CURRENT_DATE |
+----------+-----------+-------------------+--------------+
| 3.141593 |        -1 | 2.718281828459045 | 2025-04-13   |
+----------+-----------+-------------------+--------------+
1 row in set (0.00 sec)
In this interactive terminal, we can work with MySQL commands as we like.
When we are done, we can end the session with quit; or by pressing Ctrl-D. We can reconnect at any time with the same docker exec command above.
The container can be stopped with the terminal command docker stop mysql_db. Your data will persist in the container. You can restart it with docker start mysql_db.
When the container has been stopped, you can permanently delete it with docker rm mysql_db. Whenever you need it, you can easily recreate the container with the docker run command. However, this container will be a new one. Your data will be lost. The same will happen if you turn off your computer.
Create persistent storage
To avoid data loss, we can use a bind mount with the container. A bind mount associates a directory in your computer (the host) with a directory in the container. This will make the data persist on your computer.
Let’s stop our existing container and delete it:
$ docker stop mysql_db
mysql_db
$ docker rm mysql_db
mysql_db
Suppose we have created a directory named mydatabase in the home directory to store the database persistently. The database server in the container uses the directory /var/lib/sql by default. The option -v ~/mydatabase /var/lib/sql to the docker run command can be used to bind the two locations.
The container is not an isolated computer anymore, as it accesses the host system. To make the access possible, we map the container’s port 3306 (MySQL default port) to the host’s port 3306, with the option -p 3306:3306.
In short, we create and run the container with the following command:
$ docker run --name=mysql_db \
-e MYSQL_ROOT_PASSWORD=mypasswd \
-v ~/mydatabase:/var/lib/mysql \
-p 3306:3306 \
-d \
mysql
Execute the SQL shell as before:
$ docker exec -it mysql_db mysql -uroot -pmypasswd
...
mysql>
Let’s see a list of existing databases in the server.
mysql> show databases;
+--------------------+
| Database           |
+--------------------+
| information_schema |
| mysql              |
| performance_schema |
| sys                |
+--------------------+
4 rows in set (0.01 sec)
Let’s create a new database:
mysql> create database my_database;
Query OK, 1 row affected (0.01 sec)

mysql> show databases;
+--------------------+
| Database           |
+--------------------+
| information_schema |
| my_database        |
| mysql              |
| performance_schema |
| sys                |
+--------------------+
5 rows in set (0.00 sec)
Now stop the container, delete it, create it again, and execute the MySQL shell again.
$ docker stop mysql_db
mysql_db
$ docker rm mysql_db
mysql_db
$ docker run \
-e MYSQL_ROOT_PASSWORD=mypasswd \
-v ~/mydatabase:/var/lib/mysql \
-p 3306:3306 \
-d \
mysql
...
$ docker exec -it mysql_db mysql -uroot -pmypasswd
mysql>
The SHOW DATABASES command shows that our new database still exists. Any data that we put into the database will be available even after the container is deleted. Further, it can be shared across several containers, if needed.
mysql> show databases;
+--------------------+
| Database           |
+--------------------+
| information_schema |
| my_database        |
| mysql              |
| performance_schema |
| sys                |
+--------------------+
5 rows in set (0.00 sec)
If the host computer’s 3306 port is busy (maybe because you are running another server), you can specify another port, e.g. -p 3307:3306.
Connect DBeaver
Working on the MySQL command line can be limiting. DBeaver, a graphical user interface for accessing databases, can make SQL development much easier. It’s very powerful and supports many different database implementations.
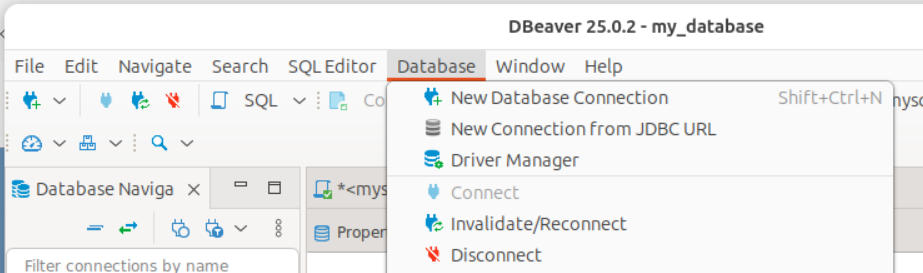
After installing DBeaver, go to the “Database” menu and choose “New Database Connection”.
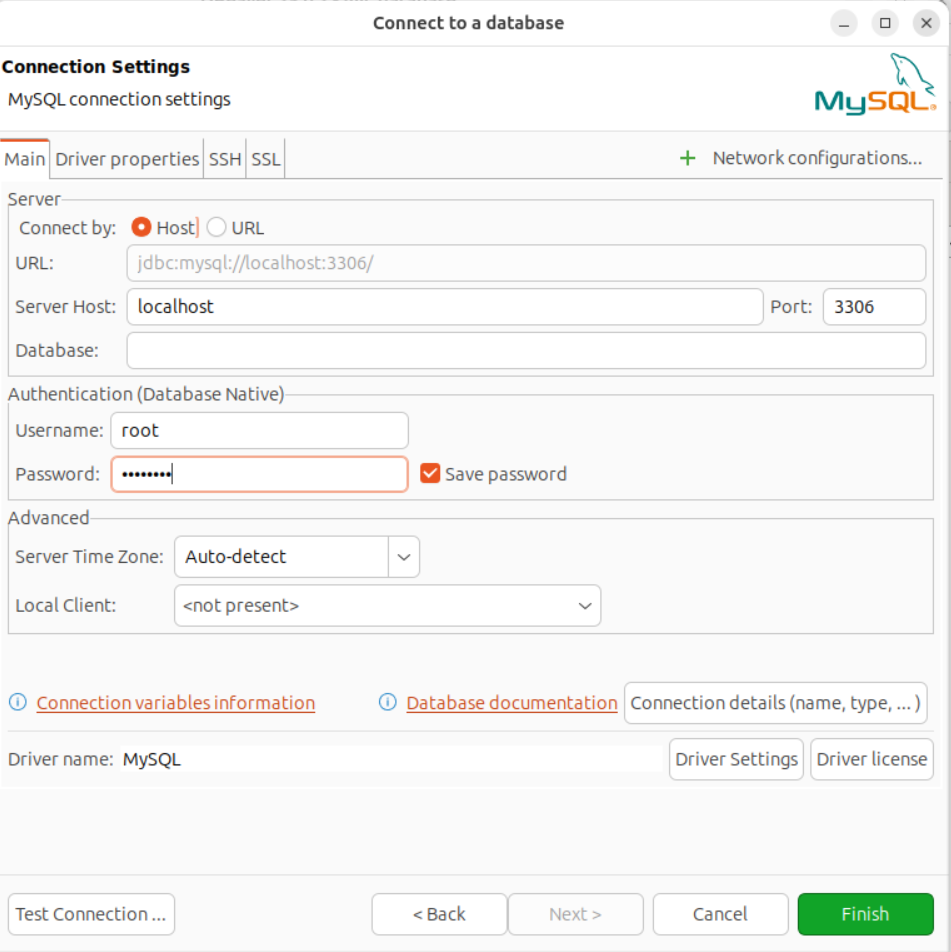
Select “MySQL” in the new window. The “Connection Settings” window will pop up. Fill the “Password” field with mypasswd (or whatever password you used when you created the container). Make sure the “Save password” box is checked.
The connection will be named “localhost” by default. You can change this by clicking on “Connection details (name, type, …)” button.
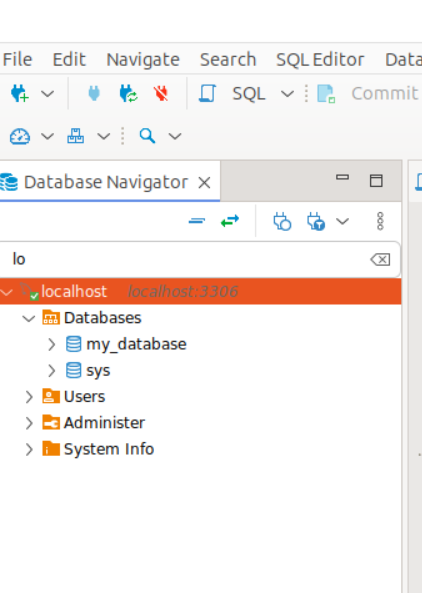
Click on “Test Connection …” to verify that the database can be accessed. If successful, you will be able to see the new connection on the “Database Navigator” sidebar. The newly created database “my_database” is also available.
With DBeaver, you don’t need the interactive SQL client (the one generated with docker exec). As long as you have the MySQL container running in the background, DBeaver can access the server.
Now you’re ready to play with your database. Instead of MySQL, you can use any other database by downloading its image and running in a container. The default ports or environment variables may differ, though. Check their documentation.